
Google Drawing can be used to create different templates, worksheets, newsletters, and more! You can create custom layered images and banners to use on websites or newsletters. (If you are familiar with Google Slides, think of Google Drawings as a single slide of a presentation.) Google Docs allows you to add Drawings as images. You can get as you’d like! Note: Most of the tutorial images or banners you see on the EdTech site or in Tech Time have been made in Google Drawings, it’s that versatile!
Read below for some features you may (or may not!) know about Google Drawing
Format Page Size (File -> Page setup)
- Default is a 4:3 screen ratio (similar to Google Slides)
- Choose “Custom” to change the size in inches (which can make it easier for printing worksheets – I typically make it 11×8.5 if I want the Drawing oriented to landscape.)
- Alternatively you can also drag the lower right of the Drawing screen in the main page to whatever size you would like but it may affect printing.
Saving Drawing as a JPG or PDF (File -> Download As…)
- Allows you to download the image as a PDF, JPG and more (which is how we save many of the images used on this site…)
- Similar features are available in other Google Apps
Adding and Arranging Objects
- Change the background (Right click Drawing field -> Background)
- Add a solid color for the background
- Add a gradient background (Background -> Gradient) You can even make a custom gradient with any colors.
- Word Art (Insert -> Word Art)

- Put Word Art on multiple lines by pressing “Shift + Enter” when typing your text
- Fill with a gradient (Paint bucket icon -> Gradient)
- Using Guidelines
- Objects when moved will show red guidelines when in the center of the page (vertically or horizontally)
- Objects may show guidelines in comparison to other objects. This is helpful when you are trying to keep particular objects in a straight line or of similar spacing.
- Group Objects Together
- Select multiple objects on the Drawing (hold shift and click). Choose “Group” from the Arrange menu (Arrange -> Group; you can also right click the objects for the same option)
- Grouped objects will moves as a single object
- “Ungroup” objects by following the same procedure and selecting “Ungroup”
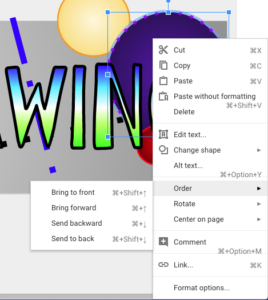
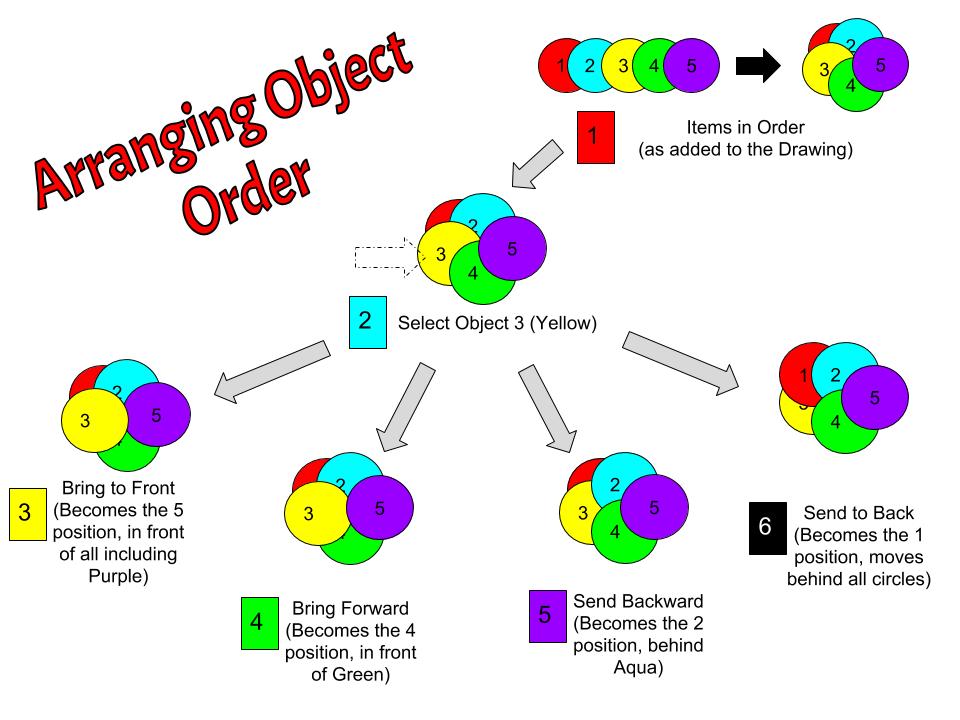
- Arranging Object Order
-
Click to View Larger
- Objects in a Drawing will act similar to a stack of papers (layered on top of each other)
- Each new object will be added to the top of the stack
- To adjust where objects are in “the stack” right click the object and select “Order”
- Bring to Front – puts the object on the very top of the stack
- Bring forward – puts the object above the immediate one above it in the stack
- Send backward – puts the object below the immediate one below it in the stack
- Send to back – puts the object on the very bottom of the stack
- Object Order also applies to Google Slides
Click to view larger
There are so many things that can be done with Google Drawings other than the basics! If you need more assistance, you can contact the Instructional Tech Coaches for assistance.
You must be logged in to post a comment.