
- What is Lightning Grader?
- Uploading answer sheets using Lightning Grader
- Reviewing scanned answer sheets using Lightning Grader
What is Lightning Grader?
Mistar DNA (Illuminate Education) has upgraded their system by integrating their own test reading software called Lightning Grader. The bubble sheets themselves are now looking a little different as well; some noticeable changes include some boxes around the edges and a QR code in the bottom right corner.
There are now two different options for inputting the test scores – both of these are under the Administration menu once you open the test.
Grade from Camera:
- Uses the webcam to scan the bubble sheets
- Allows you to edit responses as you go (double bubbles, light bubble fills, etc)
- If you have used Mistar DNA before you are probably familiar with this option
Grade from Scanner:
- Bubble sheets are scanned (via a scanner or the large building copiers) and then the file is uploaded to the assessment
- Allows you to scan multiple classes of the same assessment at the same time and edit responses in bulk
- New option from Mistar DNA
Both options are available for you to use.
Uploading answer sheets using Lightning Grader (the “Grading from Scanner” option):
Pic 1
This is a brief explanation of using Lightning Grader.
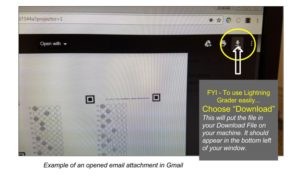
- Scan your “bubble sheets”/assessment sheets. (For help with this please see our guide for scanning to your email.)
- Open the email in Gmail and download the file(s). You can click on the attachment and choose the download arrow to download the file to the machine you are using. (Note: It is not advised to save these only to Google Drive; there may be difficulty uploading the file if it is only in Drive.) (Pic 1)
- Open MiStar DNA/illuminate and open your assessment.
- Choose to “Grade from Scanner” (the option may appear initially or you may have to look under the Administration menu.) (Pic 2)
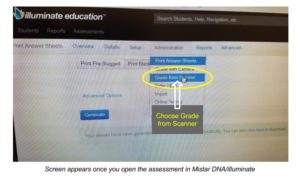
Pic 2 (Click to enlarge photo)
- Upload the file by clicking on the word “Upload” or dragging the file to the blue box. (Pic 3)
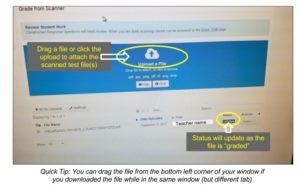
Pic 3 (Click to enlarge photo)
- Lightning Grader will start reading the test and give you the results below.
Reviewing scanned answer sheets using Lightning Grader:
- If reviews need to be made it will appear under the “Status” heading in the same line as the uploaded file. (Pic 4)

Pic 4 (Click to enlarge photo)
- Click the yellow box that says “X sheets need review” (Note: it will only show you review the answer sheets that need review.)
- Once open, you will see the digital version of the answer sheet and the picture of the physical answer sheet side by side. Review the left answer column; any answer clicked on should highlight on the physical answer sheet to the right.
- Make any corrections on the column to the left and click “save”. It is suggested that you click the “Mark as Reviewed” box in the bottom of the screen so that you will not be prompted to review the answer sheet again. (Pic 5)
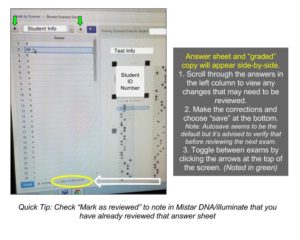
Pic 5 (Click to enlarge photo)
- Toggle between answer sheets at the top of the screen until you complete your review.
For more information you can visit Illuminate Education’s Lightning Grader help section.
You must be logged in to post a comment.