
Google Docs is the cloud-based word processing app of the G Suite that provides a similar experience to Microsoft Word. Users are able to create documents, fliers, basic tables, and integrate information with the other Google Apps. Using Docs is relatively easy; open the app and start typing. The document will automatically save in the user’s Google Drive which means less lost work should the user be interrupted.
Read below to learn more about some of the features you may already know (and some you may not know about as well!)
Formatting a Page (File menu -> Page Setup)
- Change the page orientation (portrait or landscape) or page size
- Alter the margins and set your defaults for your Docs (Altering this can help converted documents look like their originals.)
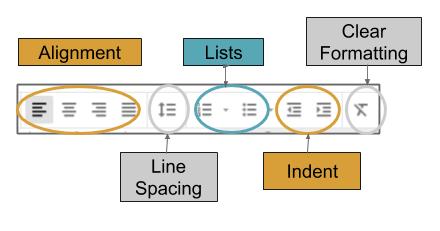
View Options (View menu)
- Show Ruler (View -> Show Ruler) shows you the side rulers at the top and side of page. This is a personal favorite since you can also use this to adjust your margins.
- Show Equation Toolbar (View -> Show Equation Toolbar) shows you different ways to create math problems within Google Docs. Alternatively, we like the extension Equatio to add math to Docs. You can read more about getting a free teacher account here.
Adding/Removing Fonts (Font Drop-down menu -> More Fonts)
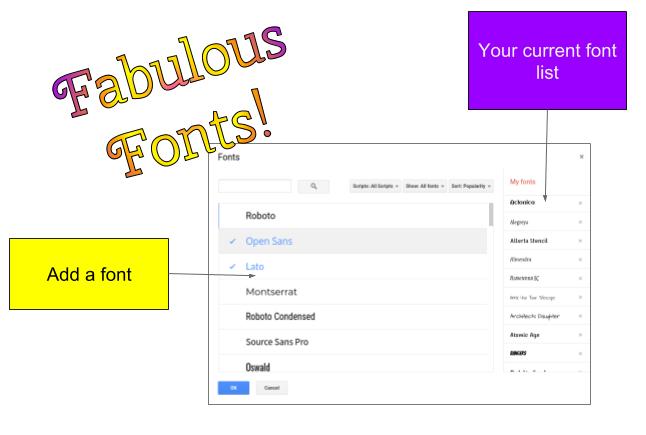
Click to view larger
There are hundreds of fonts in Google. You start with the “basics” (which may be sufficient) but you can also personalize your font preferences. (At this time you cannot upload specific fonts to Google.)
- Check the fonts you would like added – they will appear on the list to the right. Note: Any font added in one Google app will be available in the other apps! (So if you add one in Docs, it will be available in Slides or Sheets.)
- Uncheck the fonts you would like removed or click the X next to the font on the list to the right
- When searching I recommend putting the fonts in alphabetical order so that if you are interrupted you know what letter you left off on. (There are seriously that many choices!)
Pictures
- Adding pictures can be done from your Google Drive, uploaded from your device or by searching Google. (Just as a reminder – not all images are labeled for free copyright use when using the search function. You can preview the image by clicking on the spyglass if you want to investigate it further.)
- Basic Picture Layout Options include (view these options by clicking on the picture):
- In line – The picture is inserted as though it were a line of text.
- Wrap text – Move the picture anywhere on the page and the other text will “wrap” around it. (You can also change how close it wraps by changing the margins around the picture.)
- Break Text – It acts as though it were a page/column break and the rest of your text appears above or below it based on where you place the picture on your page.
- Layering Pictures (Insert -> Drawing)
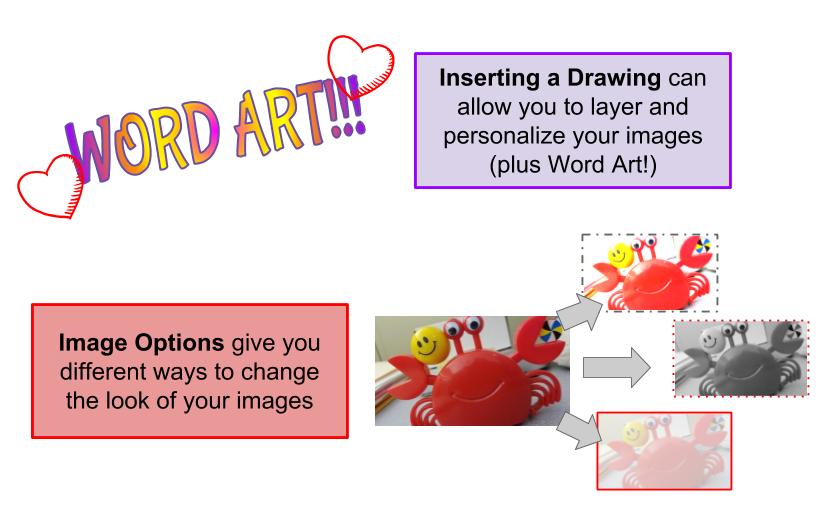
- You can layer pictures with text and clipart by creating a drawing.
- You can also create Word Art (This is one of my favorite tips; because you can layer and change the font to match whatever you are creating.)
- Adjust the which picture is on top of another by adjusting the order. (Click object in the Drawing -> Actions -> Order) Each time you add a picture or element you are “stacking” them with the newest going to the top of the pile. You can adjust their position in the stack by changing the order (forwards or backwards) which can impact how your final image looks.
- Click “Save” and your Drawing will act like a regular image. Double click the drawing to edit.
- Adjusting Pictures
- Double click the image to crop (or click the image and the crop icon) Click anywhere off the image to save the image adjustments.
- Add a border (click the image and choose the pencil or line to add/adjust the border)
- Image Options (Click Image -> Image Options) will allow you to recolor the image, adjust its brightness and contrast, and/or make it transparent.
Other Options
- Voice Typing (Tools -> Voice Typing) This allows the user to speak their response and have it typed. They will have to “say” their punctuation to have it typed; otherwise the document will be a giant run-on sentence.
- Add-ons: Add-ons help personalize the experience of the user in the app. (Think of them as app-specific extensions). If added in Google Docs, the add-on will only work in Docs.
- Insert Math (Insert -> Equations) will allow you to add math symbols and equations in line text.
- Insert Special Characters (Insert -> Special Characters) will open a menu with different special characters (accent marks, arrows, emojis, etc) in line with text.
There are so many things that can be done with Google Docs other than the basics! If you need more assistance, you can contact the Instructional Tech Coaches for assistance.
You must be logged in to post a comment.