Teaching Beginning Coding Concepts
You may have heard of the term “coding” before but wondered if it was applicable to your classroom. Coding concepts can be beneficial to any student since they tend to emphasize critical thinking, problem solving and creativity. It is important to note that as the teacher, you are not required to be able to use a coding language to teach the following activities.
In this post, we will be demonstrating some of the beginning activities that can teach coding concepts. Students and teachers do not have to have prior knowledge but may recognize other “codes” in their life (such as morning classroom procedures or routines.) The activities listed below are intended to teach beginning coding concepts to all levels of learners.
What is coding?
Coding refers to creating computer programming code. For students, this can mean writing step-by-step directions, using “block” coding, or using a computer programming language (ie C++, Python, etc).
Who can learn coding concepts?
Everyone! If they can give step-by-step directions they can code.
Why teach coding concepts?
Students are growing and learning in a tech-dependent world. By learning basic concepts, students can learn and develop problem solving and critical thinking skills. These coding concepts can complement other subjects as well as give students an appreciation of how things work.
Actual coding can be a “messy” process – it is a process of figuring out how to accomplish a goal that may have to be altered many times to find the “best” solution. It is less about a specific “correct” answer, much like a science experiment. Students practicing coding concepts will design, redesign, and possibly remix their ideas before creating their end product. These skills can be applied to other subjects, such as in Language Arts writing samples. (ie outline, rough draft, edit, final draft.) Not every person will grow up to be a computer programmer or coder; these activities can help anyone think critically about what they are doing.
Beginning “Coding Concepts” Activities:
The purpose of these activities is to teach problem solving, critical thinking and creativity. Some require additional equipment that can be borrowed from the Instructional Technology department by visiting the EdTech Available Technology page.
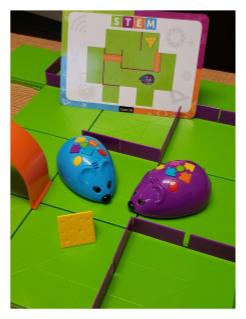
Code and Go Mice*
*Click here to borrow (WWCSD only)
Students will set up the maze using the Maze Kit. Their goal is to get the cheese.
- Set up the maze (Maze pieces will drop into place – it’s recommended to have the “hooks” pointing in the same direction when making the grid maze.)
- Place the mouse and cheese on a maze tile.
- Walls and/or tunnels can be set up as needed.
- Predetermined maze cards are included in the kit.
- Press the buttons on the back of the mouse to direct the mouse to the cheese. (Mouse should be on “Normal” speed; “Hyper” is for when creating on other surfaces such as a classroom floor.)
- The mouse moves forward or back in increments of 5 inches.
- Press the green circle to “Start” the mouse.
- Press the yellow circle to “Clear” the previous directions from the mouse (otherwise you are adding to the previous set of directions.)
- The red circle allows the mouse to do a random action/sound that will result in it being in the same square.
- Let students try different mazes and board configurations.
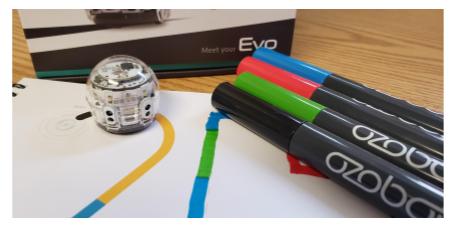
Ozobots* (Markers)
*Click here to borrow (WWCSD only)
- Copy the “Sample activities” or Ozobot Boot Camp activities (can be found on their website)

- Have the students practice filling out an activity sheet
- Turn the Ozobot on and place on the start spot.
- Suggested activities include “Drawing lines”, “Drawing corners and curves” and “Seeing Color”
- Have students practice drawing different paths and color codes.
- Use the color codes chart as a reference
- Please do not use dry erase markers. (Dry erase markers may leave deposits on the bottom sensors and cause the Ozobot to malfunction.)
Physical Maze Directions
*Note: this activity works best when the students can walk on something with a consistent spacing, such as a square tile floor. (Each block acts as 1 “step”.)
Students will be working in pairs to guide each other to a specific location. One student will write the directions (the “coder”) while the partner will “test” the coder’s directions.
- Define the space (ie the hallway) and place markers (such as numbered post-its) on specific tiles.
- Define “Start” and “Goal” squares.
- The “coder” will write directions for their partner to follow from a defined “start” spot.
- Starting spot could be consistent for all players or vary by team
- “Coder” can write full directions (sentences) or just arrows to direct their partner to the goal. (It’s recommended to try both ways.)
- Once completed, they will give their directions to their partner.
- Partners will take the written directions and follow them exactly.
- Partners do not help write directions. (It’s best if they separate from their partner.)
- “Coders” will watch how their partners follow the directions and if they arrive at the goal.
- If the partner does not make it to the goal, the coder can take the instructions back and see if they can improve on the directions. (Or have the partner and coder switch position, but use the existing directions to “fix” them.)
- Switch afterwards; if using the same start point, have the new “coder” try to find a different route.

You must be logged in to post a comment.