
As more teachers have begun to integrate distance learning, some have started using Google Classroom. Google Classroom allows teachers to push out links, resources, or assignments to students remotely. This allows students to “attend” class away from the physical classroom and sometimes revisit previous materials to enhance their learning.
Using Google Classroom, teachers may post the following:
- Videos and resources (such as screencast lessons or directions)
- Links (to external sites)
- Assignments (to be completed individually or as a group)
- Reminders (such as important due dates, meetings)
- Question polls or surveys (collect data from the students)
Please remember – much like a physical classroom, each Google Classroom will be unique to the teacher.
How can students get started using Classroom?
Teachers can invite students to join their class one of two ways. The student will be given a “class code” or they will have been “invited” to join the class once they go to the Classroom landing page. This only needs to be done once for each Classroom.
Please note: If the student has never signed in to Classroom before they may be prompted to choose if they are a student or a teacher. (Choose Student.)
If the student has a “class code” –
- Go to Classroom.google.com (make sure you are signed in with your district account).
- On the “Classes” page (the Classroom landing page), click the plus sign in the upper right and choose “join a class.”
- Enter the given class code to join the Classroom.
If the student has been “invited” –
- Go to Classroom.google.com (make sure you are signed in with your district account)
- On the “Classes” page (the Classroom landing page), the teacher’s Classroom tile should appear with the option to “Join”
- Select “Join” to load the Classroom.
After the student join a Classroom –
For both of these options, the Classroom may take a few minutes to set-up. After it is set-up it will open the class. The next time the student views the Classroom landing page they will see a tile for the Classrooms they have joined.
How can students use Classroom?
Students will have options set by the teacher of how to interact in the digital Classroom. Note: Not all of the options will be available in all Classrooms; it will be based on how the teacher has set it.
There are three tabs at the top (Stream, Classwork, People); generally students will need to interact with the first two.
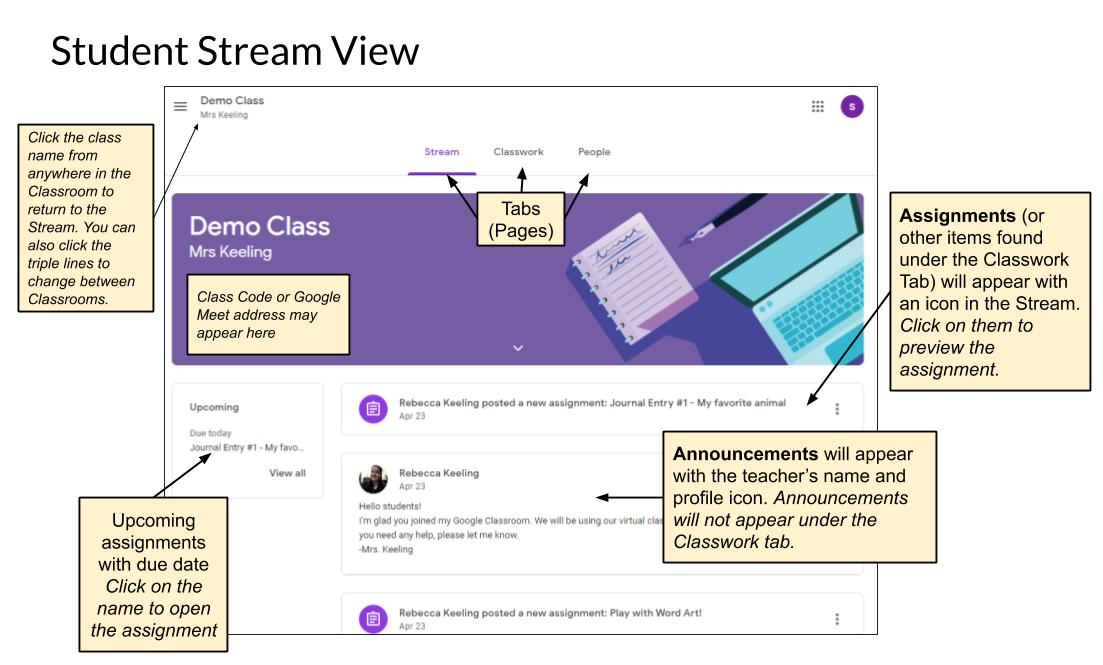
Stream Tab
This is the “homepage” when you open a Classroom. Students may view announcements, assignments, and other information in the Stream. Items in the Stream are usually posted in chronological order (or newest first) unless reposted by the teacher.
Good to know:
-
- If there is upcoming work due, it will appear in the box under the banner on the left. (Click on it to be taken directly to that assignment.)
- If your teacher is using Google Meet for class, the link may be posted on the banner at the top. (They may have also posted it as an announcement on the Stream.)
- Click on an assignment on the Stream to be taken to that particular assignment (you have to choose “View Assignment”)
- Students may or may not have the ability to post or comment on the Stream. (Determined by the teacher.) If they have this ability, everything is visible to the teacher even if it is later deleted. It is recommended that comments posted here are general class questions or comments; something that a student may raise their hand and ask in class.
Classwork Tab
This is where students will look for their assignments. Teachers can post different types of assignments with necessary materials here. This is generally the main page used in Classroom.

Good to know:
- Assignments – can be clicked on to preview directions or resources; to turn in work, students will have to click “View assignment” to open the full assignment
- Topics – teachers may use “Topics” to help organize assignments and resources. If they are using them, students may click on the topic name (in the box to the left) to view only those assignments for that topic.
- Resources – can be posted here as well, generally these are things meant to be easily accessible for a longer period of time (versus a resource attached to an assignment)
- Questions – These are quick polls (or single questions) for the entire class. Responses may or may not be able to be viewed by the class. Students will be able to see their individual responses.
- Videos – Youtube videos should open automatically, not redirecting the student to Youtube. Please note: If the student clicks on another tile at the end of the video it will open a new tab to Youtube.
How can my student turn in their work?
Students will need to open the specific assignment under the Assignment tab. (Click the assignment and choose “view assignment”.)
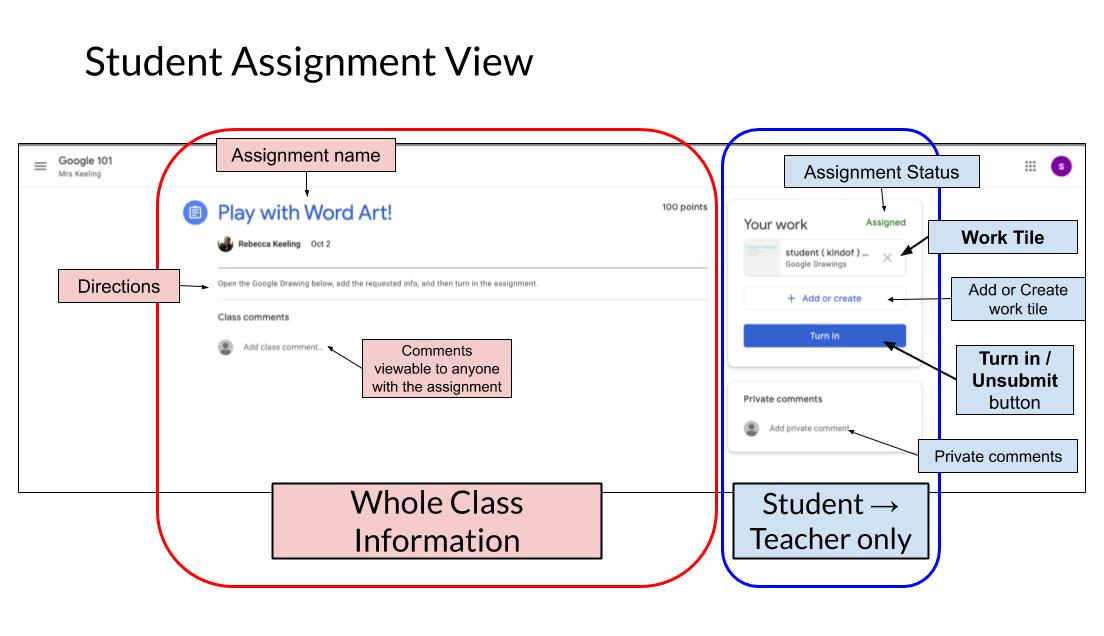
Viewing an Assignment
The left portion of the screen will contain assignment directions and resources. There may also be a spot to make a “class comment.” This option is set by teachers (so may not be available) but if so would be a comment viewable by anyone with that assignment. Please remember, all comments are viewable to the teacher even those deleted later.
The right portion of the screen will contain the student’s work and any private comments. Private comments are sent between the student and the teacher.
Please note: sometimes if viewing on a mobile device or smaller browser window, the class instructions and resources will appear above the student work and private comments. When looking for or turning in student work, it will appear in a box labeled “Your Work.”
Turning in Work
(View our video on how Students Turn in Work)
There are two different ways for students to turn in work. They will either complete an assignment file given to them by the teacher or need to create-then-attach their work to the assignment.
- Open the assignment (remember to “View Assignment”)
- Check if the teacher has given the student a file –
- Look for a tile under “Your Work” that says “student’s name – assignment name”
- Skip to step 4 (if there was a work tile)
- If the student has no work tile – (View our video on how to attach or create a file for an assignment)
- Click the “+Add or create” tile
- To add a file (or link) already created and completed, choose the location of the file (Google Drive, a link, or File – which allows you to upload from your device)
- To create a file to work on, choose the best file type listed under the “Create new” menu. (It will create a work tile under “Your Work.”)
- Click on the file tile to complete the work. (Remember to check the directions!)
- When finished turn in your work by clicking the “Turn in” button below the work tiles. It will ask you to confirm the attached files before finishing the submission.
Good to know:
- If there is a work tile listed under “Your Work” it is already shared with the teacher – you do not have to “share” the file with them from within the document. If the file is not attached to the assignment, the teacher does not have the ability to view it.
- When completing some Google files, you may see a “Turn in” button (right upper screen next to the “Share” button). When clicked, this will open a new tab with the assignment to which the file is attached. Not clicking that will still allow the student to turn in their work if they open the assignment as usual in Classroom.
- If you attach the wrong file (or make too many files) you can remove them from an assignment by clicking on the X on the work tile. All assigned work is saved in Google Drive in the Classroom folder. If a file given by the teacher or created is removed in error you can reattach the file from the Classroom folder in Google Drive.
Unsubmitting work
(View our video on how to Unsubmit Student Work)
When a student turns in work, they give temporary ownership of the work to the teacher. This means that they cannot edit it or add to it after turning in unless they have unsubmit the work. This is a useful feature in case the wrong file was attached or in case the student wants to make corrections to their assignment.
To unsubmit student work:
-
- Open the assignment (remember to “View Assignment”)
- Under the “Your Work” block, click the “Unsubmit” button. It will ask you to verify you want to do this. If you choose to unsubmit, the work is given back to the student as though they did not turn it in originally.
- Complete the necessary changes.
- Resubmit your work!
Good to know:
- Unsubmitting and resubmitting an assignment with a due date may make the assignment “late.” It is recommended the student contact their teacher, perhaps through the private comments on the assignment, if this is a concern.
You must be logged in to post a comment.