
Update December 2020 – Unfortunately Google has made the decision to discontinue Tour creator as of June 2021. All tours will need to be saved and downloaded elsewhere before then.
Google has many different ways to incorporate users into their “world”. Users can view anywhere in the world by investigating Google Maps or Earth. Drop the Pegman (aka the “Yellow Street View Man”) where there is a blue line in either and you will be able to explore the surrounding area. Users can explore a spherical view of the area or even “walk” through the area in many instances.
In recent years, Google has expanded its geography resources by allowing users to create content via Google MyMaps, Tour Builder and recently Google Tour Creator. MyMaps allows users to create a personalized Google Map (they control the points of interest and content shown) while Tour Builder creates a tour similar to a “Voyage” in Google Earth. (If you haven’t seen a voyage, open Google Earth and click on the ship’s wheel on the left hand menu to view curated “voyages” with information.)
Tour Creator is the newest app which combines spherical photos with image overlays. It can be viewed on screen but also in virtual reality by using Google Expeditions.
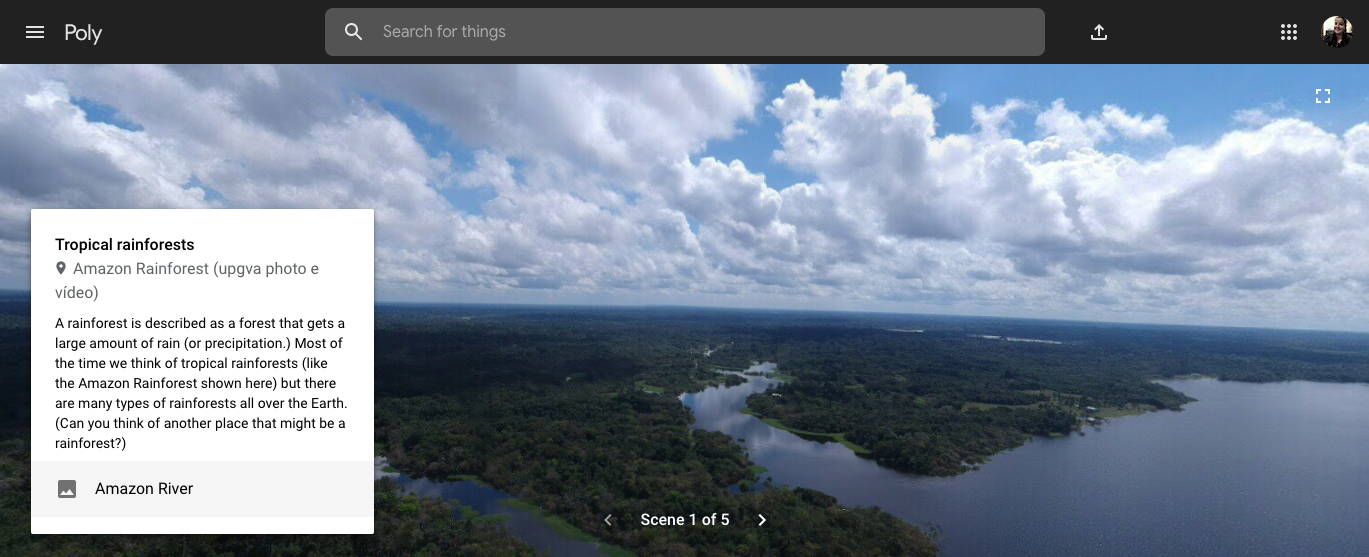
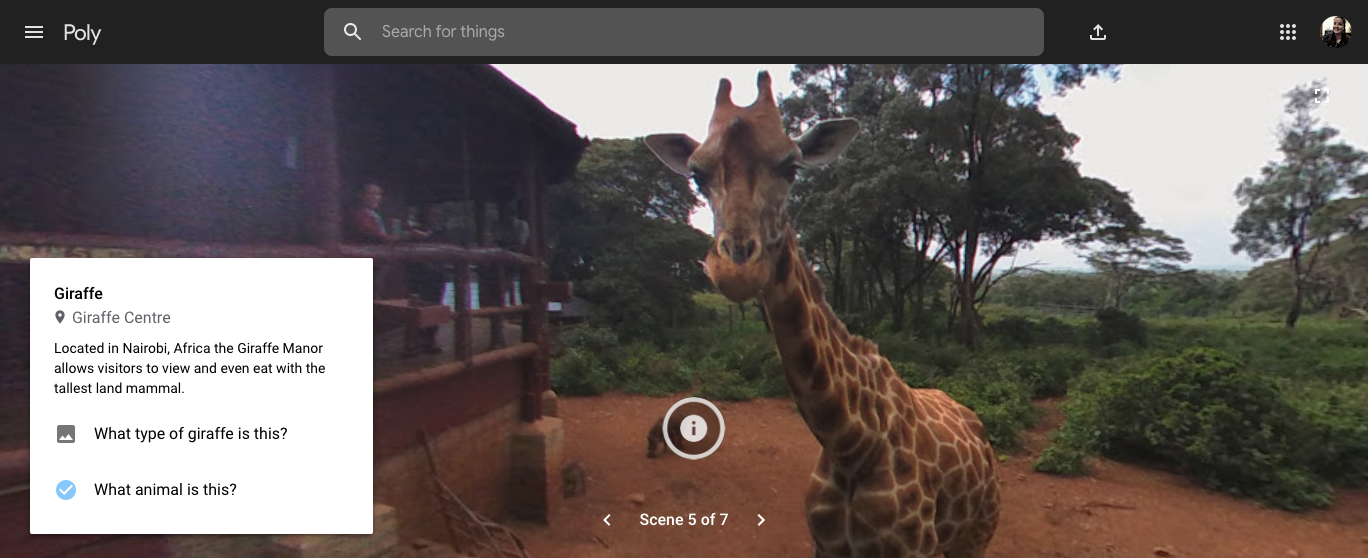
Text presented at the left is added by the tour author and adds points of interest on the screen.
Why try Google Tour Creator?

Users can create virtual reality (VR) content using Google Street View images as well as their own images. User-created tours can now be imported in Google Expeditions. Users can plot their locations and add information via text or multiple image types (pictures, charts, images, etc). Tours will be saved for viewing in Poly, Google’s online library of 3D images.
Creating a Tour
- To get started, go to Tour Creator and sign in using your Google account by clicking the “Get Started” link. (If you are already signed into Chrome or Google it may skip this step.)
- Choose to create New Tour (+New Tour) or use a Template.
- Set up your Tour
- Add a title, description, and category
- Add a cover photo (Without a cover photo the tour will not be able to be published)
- Add a Scene (bottom of the screen) Two options:
- Street View – put in a name or coordinates to find a location. Drag Pegman to a blue line/spot and drop him to preview the image in the right screen. (This may be the most time consuming process – there are so many places and views to preview before finding the “correct” one you want to use.) Click “Add Scene” when you have made your selection.
- Upload – Add your own image. (The image needs to be a 180 or 360 degree view photo to upload your own image.) Click “Add Scene” when you have made your selection.
- Enhance your scene (right menu)
- Add/Edit the Title, Location and Description. (All of these will appear on the screen for those viewing your tour via Poly – not through Google Expeditions)
- Credit – Give credit to your sources. (These will appear at the bottom of the screen when viewing in Poly or on the Guide’s screen in Google Expeditions.)
- Add Ambient Audio or Screen Narration (Do either by selecting the icons below “Credits”)
- Add points of interest
- Select a spot on the scene to draw attention to (When viewing in Google Expeditions, this can direct viewers to this specific location.)
- Add a title and brief description (This is also where you can pose questions to ask viewers)
- Add a photo (This can be more than just a picture. Add charts, comparison images, or whatever .jpg image applicable. Please remember to give credit to your source in the credits line if necessary.)
- Add Screen Narration for your point of interest if desired
- Publish your Tour. Choose either “Public” or “Unlisted”. (Once published it will give you the option to view the tour.)
How can I view or present a created Tour?
Published tours are saved in Poly automatically. Users can list their tours as public or unlisted. If the tour is public, anyone can search and view the tour. If unlisted, users can share the Poly link which will allow viewers to see the tour and information without VR headsets. I have used this option to display it on the SMARTboard or Chromebook with students. Viewers will be able to access all the information on the tour by scrolling through the scenes.

Either way, public or unlisted, for the “full effect” tours can be initiated in Google Expeditions and viewed using a VR headset. Google Expeditions is recommended for users ages 7+ via their opening notification. With younger viewers, they can use a tablet to act as a “window” to see the tour without using a VR headset. I did this in the past with a Grade 1/2 class, which was very successful (as well as fun!)
Accessing your Tours in Google Expeditions:
- Sign into Google Expeditions (Viewers do not need to sign in)
- Open the “Library” Tab.
- Under “My Tours” download the tour you would like to guide. (You must be signed into the account that created the Tour. Also, if you have not published the tour it will not appear.)
- Open the “Class” tab and choose to be the “Guide” (All viewers should choose “Explore”)
- Choose “Start Guided Session”. (You will see your email and a code for verify you as the guide. This will appear to viewers when they select your name as their guide.)
- Choose your Tour and begin the session!
You must be logged in to post a comment.