
Emailing WWCSD Groups and Contact Groups
In WWCSD there are 3 basic options for sending emails to a group of people which could be used based on the people you are sending too.
- Sending emails to selected district staff groups
- Creating personal email contact lists
- Emailing students and/or student contacts through MiStar
1 The district has created email groups for specific district staff groups
Certain staff groups in the district have had email groupings created to ease communications. These groups can only be emailed from a WWCSD account to cut down on the possibility of spam messages. A list of these groups can be found behind the Staff Door on the District website under Email Groups. The majority of these are building and department groups.
In Gmail, just type the name of the group or its email address to send to that group. If you find an error with a list: i.e. someone shouldn’t be on the list or someone is missing, please put in a Help Desk ticket so it can be corrected.
2 Creating personal email contact lists
Personal group lists can be created for use with Gmail inside of Google Contacts. If you are regularly emailing a specific group of people and do not want to have to type in everyone’s email every time you need to contact them, then you will want to create a group list, Google doesn’t call them groups! Google calls them Labels.
The first requirement is to make sure that all of the contacts you wish to put in your group are in your Google Contacts. Contacts can be added from a Gmail message or manually in Google Contacts.
- Adding from Gmail is the easiest way. You can hover over a name in your Gmail and a contact bubble will open where you can add someone to your contacts
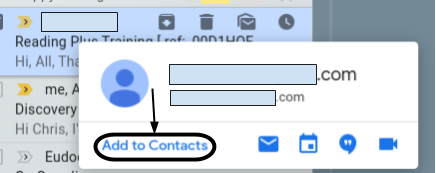
- Or, a contact can be created directly in Google Contacts.
- Go to Contacts
 inside of the App waffle and click
- Go to Contacts
- Once you know all of the contacts you will want in your group list are available, you can start making your groups.
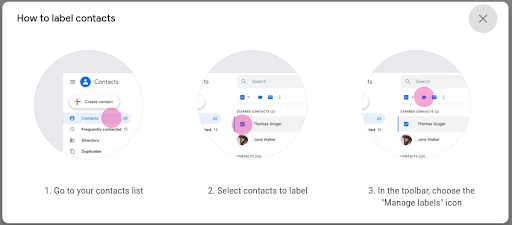
- Go to Contacts
- In the menu on the left of the screen, find your labels list. This is where all of your “groups” will be listed.
- Click on “Create label” to create a new list and give it a name. You will use this name in Gmail to send messages to everyone you put in the group.
- After saving the name, it will appear in your list of Labels.
- Now to add contacts to the labels. Click on Contacts in the right-hand side menu. When you hover your mouse over a contact a checkbox will appear where their picture or initial usually is. Check the box (you can check multiple people or one at a time) and click the Manage labels button
 and check the box next to all labels you would like that contact added too.
This can be a little bit of a time-consuming process to start but can be a huge time saver later on.
- Go to Contacts
3 Emailing students and/or student contacts through MiStar
MiStar has an option to send emails to your students or their listed contacts in MiStar. This can be a quick way to contact students and/or guardians without having to create personal contact groups.
- After logging in to MiStar, navigate to Menu -> School -> Mass Email.
- There are three sections in the MiSTar Mass Email system; the message, the recipients, and filters
- The filter system at the bottom of the page is a good place to start to narrow down who messages are going to go to. Some things to consider:
- If you have multiple classes; does every class need to get the message?
- Does the entire class need the message or just a select group of students?
- If you teach multiple grade levels, do students from each grade need to get a message?
- While there are over 20 filter options, the most used are likely to be Class, Student, Period, and Grade
- Once the filters are adjusted, move to the Recipients List
- Click on the “Refresh List” button to see the list of recipients.
- There are three checkboxes at the top; Student, Contact, and Relation Lives w/ Student

- Student checkbox will email all students listed
- Contact checkbox will email all primary contacts of associated student
- ***Relation Lives w/ Student checks the 1st listed Primary Contact of each student IF they have an email address on file. *** If the first contact does not have an email but the second does, no email will be sent.
- You can mix and match as needed and then adjust manually to make sure all needed recipients are selected.
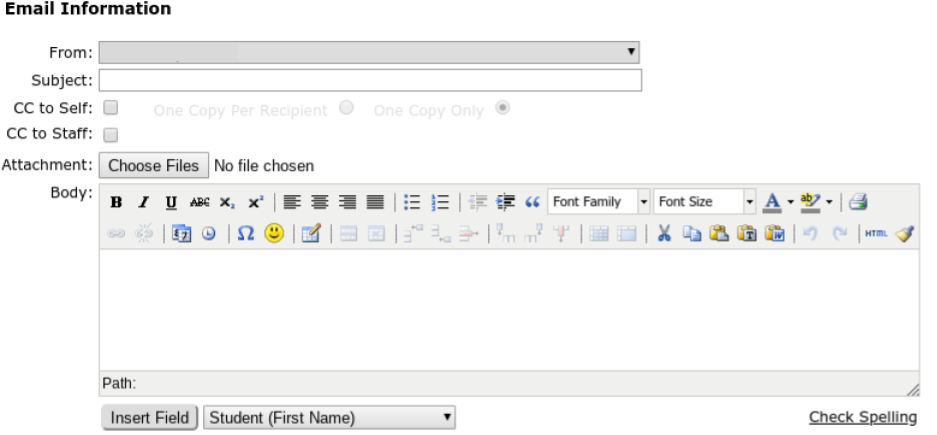
- Lastly, Compose your message
- Give your email a Subject
- A copy can be CC’d to yourself or other staff members in your building
- Files from your computer can be attached. To attach Google files just put the link to the file in the email.
- The emails can be customized with the Student’s name using the Insert Field.
- The message itself can be edited with the available tools, or a message can be copy and pasted from another location.
- The filter system at the bottom of the page is a good place to start to narrow down who messages are going to go to. Some things to consider:
You must be logged in to post a comment.