
Google Forms can be used for a multitude of things including surveys, data collection, quizzes, or even creative writing. When creating a Form, users can choose from multiple types of questions such as long/short answer, check boxes, or multiple choice. (See the right image for a complete list)
There is also an option to direct respondents to different questions based on their answers. This allows data to stay together rather than creating multiple forms. We have used this previously for our Summer Tech Camp survey. We ask what day participants attended (multiple choice) and if they respond “yes” to a date, they are sent to one set of questions. If they respond “no”, they skip that session and go to the next question. We keep all the data together and the respondents only fill out one Form.
How could you use this with students?
- Introduction/Review activity – Students will answer a question and if it is incorrect they will be sent to a brief activity to introduce/review the concept. Then they can be sent to the original question (to try again) or to another question after completing the activity. (Example used in video below)
- Project updates – Students working (possibly in groups) can choose from a host of topics and either submit a possible project. If they are already working on a project, they could submit updates by selecting their group and then answering questions.
- Student reviews – anonymously, students could observe different student projects and give honest reviews. Example: Which project did you view? (Response directs them to that project section in Forms.) What did you like about the project? How could they improve? Did you observe any other projects? (if answering “yes”, they are directed back to the original question; if “no” the Form is submitted).
- Creative writing – Students can create “Choose your own adventure” stories. These stories are written in sections and based on the reader’s choice will change the plot and/or ending of the story.
Set up for response-directed Forms
- Create a Form.
- Create your Section(s)
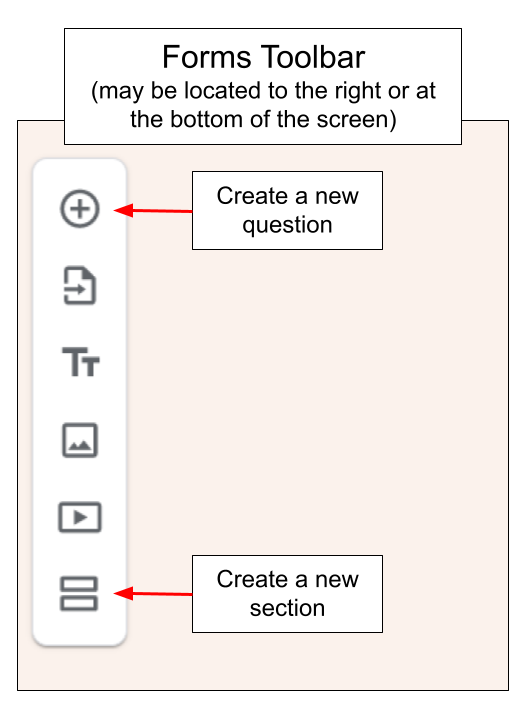
- You can create a new section by clicking the = on the toolbar.
- Give your section a title (it makes it easier to when linking later)
- Add any text, movies, pictures or questions beneath each section. (Can be added or adjusted afterwards as long as you have the section(s) created.)
- Create your multiple choice question
- This will be the question that based on the response will send the respondent to a different section.
- Toggle the question to “Required” (bottom right of the question tile). If you don’t, the respondent can “skip” the question and may go to the wrong section (depending on how you set up your Form).
- To link the answers to different sections
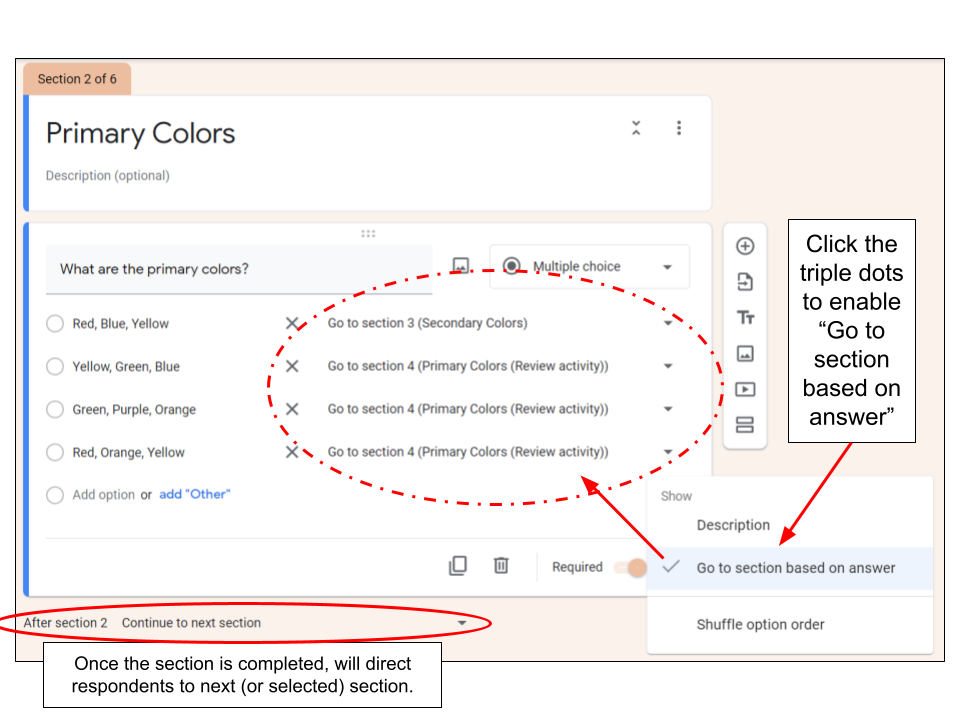
- On the multiple choice question, select the triple dots in the bottom right and choose “Go to section based on answer”
- All the answers will have an option to “Go to next section” appear to the right of the answer
- From the drop down, choose what section each answer should be directed to.
- Respondents can be prompted to submit the form as an option
- Tip: always choose the specific section you want to direct the answer to. This way, if you move sections on the Form, the links will stay as intended.
- From the bottom of each section, you can also direct the respondent to another section. (Click the drop down below each section for the same options when directing a question answer.)
Highly Recommended – Always preview your Form before sending it! Click on the “eye” icon in the upper right (next to the “Send” button) to check your links and make sure they work. The preview option will open in a new tab and you can make corrections if necessary in the original tab. Hit “refresh” on the preview tab to see your changes reflected instantly. If you make changes after someone has submitted the Form it can adjust how your results are seen (adding a new column in the responses Sheet at the end, leaving the previous answer as an option in the graphs, etc).
To learn more – check out the video tutorial below using an introduction/review activity on primary and secondary colors. For WWCSD teachers – you can make your own copy of the Form used in the video to see how I linked the questions.

You must be logged in to post a comment.