
Breakouts can be a fun way to engage students in the classroom. Physical breakouts allow for the players to manipulate the clues and locks. Digital breakouts for allow more players to access the clues since they are not limited to one set of physical clue. Both physical and digital can be done collaboratively and help foster creativity, critical thinking, and communication.
We have shared in the past about how to get started playing and creating breakouts (see past Breakout posts). As with many things, the more we play and create these games, the more we learn what works for us. The following are some of the suggestions I have after playing and creating Breakouts (for over 6 years) that may help integrating these games into your classroom.
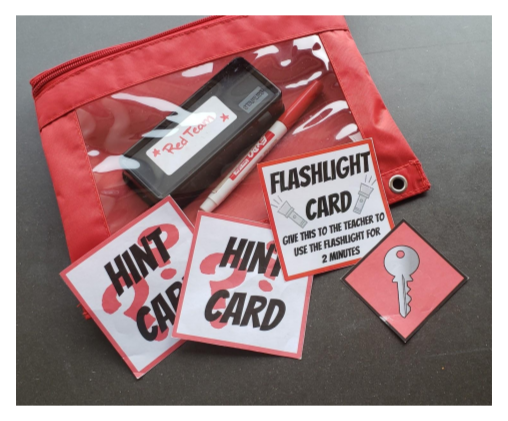
This is my “basic kit” for each team. Everything is color-coded for ease of use at a glance. Generally included are two hint cards, a few dry erase markers and eraser (for laminated clues), a key card, and a flashlight card (helps the flashlight being left on). Depending on the game they may also find clues in the pouch. Teams get this at the start of the game.
Tips for Playing Physical Games:
One thing to note is that I play with “color” teams. Each team is a designated color (ie Red Team, Silver Team, etc). I found this allows me to mark things easier and keep each teams’ supplies together at a glance. (Example: Red pouch, red marker, red paperclip on their key for the key lock, etc) This idea can be substituted in other ways (letters, shapes, etc) so do what works for you. I like the simple visual of knowing all the “green” pieces belong to Green Team. Depending on your players you might want to combine a color with a shape as an accommodation.
- Outline your expectations for play
- Part of playing a physical game is embracing a little “creative but contained chaos”. Identify the parameters for play such as team “bases” (where they can go to solve their clues and other teams should avoid), etc.
- Demonstrate how to open the locks (if able). We use recording sheets in case a team cannot get a lock open due to operator error or the lock jamming. If the code is on the sheet we count that as opening a fussy lock. (Ultimately I may have to fix the lock later so this relieves some of the pressure.)
- Stress the off-limits areas
- Remind students which areas are “off-limits” to help limit disruptions. (Example: nothing in student desks/backpacks, higher than the shortest person in the room, teacher’s area, etc)
- Before starting the game, I use a slide deck that shows them “the rules” and some helpful hints to use my locks. This has helped ease some unrest since the players don’t feel anyone will “invade” their personal spaces. It also helps to reinforce the expectations for play.
-
Noticeably mark your clues for specific teams (if playing with multiple groups at the same time)

Sample of different clues marked for specific teams
- If playing with more than one team, sometimes keeping teams from taking another group’s clue can be an issue. The solution is to designate different teams (ex Team A or Team B) and label their clues so they know to only take their clues.
- Very helpful if clues look similar (ie two different receipts players need to find)
- As mentioned previously, I chose to use a color code system (ie Red Team, Blue Team, etc). Each team has their own pouch of specific items for play that matches their colors. The actual clues I use a sticker/marker to color part of the clue so that team knows it’s theirs. This has eliminated some of the questions if a clue is “theirs” when playing multiple teams in the same space.
- If needed, create a physical barrier to separate teams (if playing with multiple groups at the same time)
- Depending on the space, you may wish to have a physical barrier to keep teams “on their side”. Desks, chairs, or even a line of masking tape can help detour players from hunting in “the wrong side”.
- This is helpful for two reasons: if your clues are not marked for specific teams it makes sure only the teams only have access to their items, and it also keeps the “wanderers” from drifting to other teams. (During the game it’s normal to see players curious how another team is solving a clue. The physical barrier can help minimize this temptation.)
- Laminate your physical game clues
- If you are going to play this game more than once, laminate your clues if able. By doing this you will only have to print them once (or at least not as frequently) and you can use dry erase markers to write on the clues (and remove markings later).
- If you are marking/designating your clues to specific teams do this before laminating.
- I don’t laminate every game I play. I will usually play it through with a group first and then determine if we are likely to play again before making the choice to reprint and laminate.
-
Don’t hide your actual key for them to find (unless it’s unlocked/found inside another breakout box)
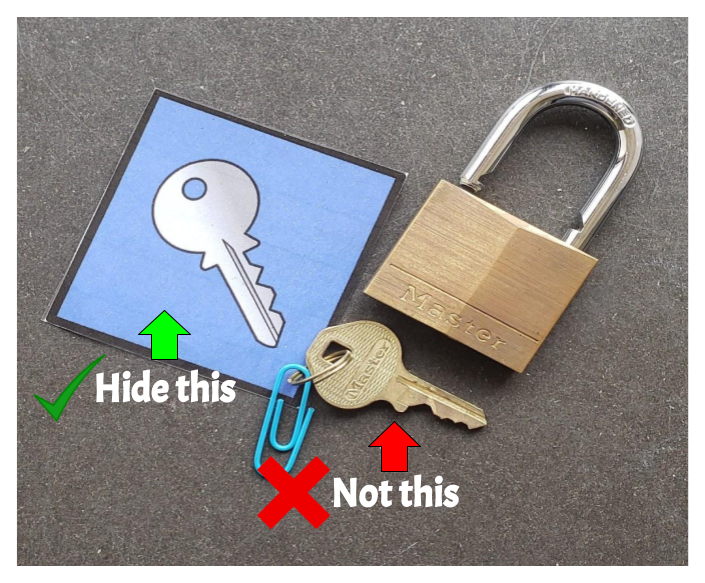
Example of a “Key card” that players can find and give to me to open their box. I also label the keys with colored paper clips so I give the teams the correct key. (I usually play with 3-4 teams at a time and they all have similar locks.)
- If hidden, physical keys can be jostled and moved around during the excitement of gameplay. (This can cause some players to lose their team key and not open the breakout box.)
- Having almost lost a few keys to heating vents or deep shelves, I don’t hide physical keys anymore. Instead I created a color-coded “key card” that I will hide instead. Players will return it to me and I will give them their physical key to remove the lock. I also will mark each key with a colored paper clip so I know which one goes to each lock.
Tips for Playing Digital Games:
- Play as teams (or individuals)
- You can play as teams during a digital breakout! The teams should be smaller, but all the players can view the clues on their own devices which (unlike a physical game) gives them access to multiple copies of the same clue.
- Teams can submit one set of answers but still collaborate to find the answers.
- Don’t stray off the “game”
- Depending on the format of the breakout, it is best for teams to stay on that site/doc/slidedeck unless directed to do otherwise. Clues tend to be specific to that game, and googling for an answer may cause players frustration.
- I use Google Sites to house my digital breakouts. Each site has all the information necessary on it and if players look elsewhere they will likely find wrong information. If you don’t see a clue or information you think you need to solve something – you either didn’t really need it or you need to keep searching. Depending on the suggested player age I might make things very noticeable or hide things in text or links.
Tips for Creating Games:
- Change your page size to 8.5″x11″
- Wherever you choose to create you clues (Slides, Docs, Drawings, etc), before starting change the paper size to be easily printable. This allows a digital game to possibly become a physical game (or vice versa) without reformatting.
- Create a clue explanation and lock codes sheet for ease of game play
- Have an at-a-glance sheet with all the lock codes in one spot for each game. (This can save time when you are moderating the game and checking progress. Just don’t let the players see it.)
- Having a brief “how to solve” clue explanation can also help especially if you haven’t played the game in a while.
- For both of these, I keep them on one sheet (actually it’s usually the first slide in my creation slidedeck with all my printables). Then if a team is struggling on a clue I can see how to either assist them or possibly improve it in the future.
- For Digital Clues
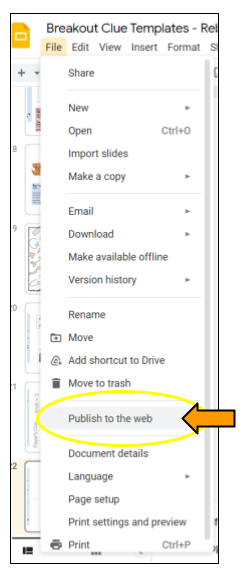 Unless the players need to manipulate a clue – use the “Publish to the web” option (Google)
- Linking to PDFs or documents in your Drive will save access to your clues in a player’s “Shared with Me” part of Google Drive. (Which can then be shared with others, etc)
- If using Google Slides (or other) you can “Publish to the Web” your Slide, etc and it will display as a website instead of giving access to the information.
- This keeps people out of your Drive but still allows players to access the clues. As a side note, you can publish things publically or (usually) you can restrict it to only within your organization.
- Clues that require player interaction
- Make sure the file is shared to view with to anyone with the link (or in your organization)
- In the link URL you are posting, change the word “edit” or “view” to “copy” to force the player to make a copy of your original. (example: docs.google.com/-extra-identifier-info-here-/
editcopy) - Stop players from moving important info. If using Slides, under File choose “Download as” and “PNG” to save a copy of your original slide (without anything the players will have to manipulate). In a new slide deck (make sure it is the same page size), use that image (PNG) for your game as the background on the slide (then players can’t accidently move information that needs to stay in specific locations). Add anything they will need to manipulate on top and when they open their copy they will only be able to move the pieces that are necessary.
- Digital clues can be used in physical games as well! (Some clues may work better digitally)
- Use a QR code to get viewers to your link. To do this, open the link in Chrome. In the URL bar, click the arrow next to the bookmark star and choose “QR Code”.
- Hide a URL for players to find (examples: Assemble a puzzle, write the URL in black light pen, etc)
Final thoughts
Please keep in mind, these are things that have worked for me in the past and may not be applicable to your setting. If you need any assistance with these suggestions or you would like help getting started with Breakouts, please contact Instructional Technology.
You must be logged in to post a comment.