
There has been a lot of talk about Clever around the district as of late. What is it? What does it do? Why would my students or I use it?
What is it?
At its core, Clever is a Single Sign-On (SSO) service. In more generic terms it provides a portal that students and teachers can go to access the many different digital applications that are used on a regular basis. For some of the applications, Clever allows for communication between MiStar and the application to allow for student and class rostering. Once a teacher has logged in to Clever, they have the ability to see their classes and enrolled students (Classes tab), a library of available applications that can connect through Clever (Library tab), and a list of pages and applications that are already attached to your account (Homeroom tab). For WWCSD staff and students to access Clever; go to https://clever.com/in/wwcsd and log in with your District Google credentials.
![]()
The Homeroom tab
is where you can see the different pages you have set up (Hint: you can set up more than one page). It has all of the applications that you have attached to your account as well as those pushed out by the district. Applications pushed out by the district are usually the ones that are to programs the district is either paying for or are strongly recommended. The applications are pushed out by grade or subject requirements, i.e. elementary programs will not show up on a secondary teacher’s page and vice versa.
The ![]() button allows you to create new pages or go to the Library tab to add new applications.
button allows you to create new pages or go to the Library tab to add new applications.
Pages
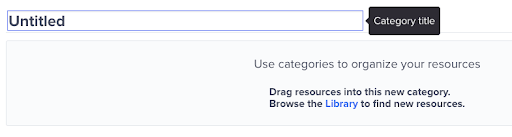
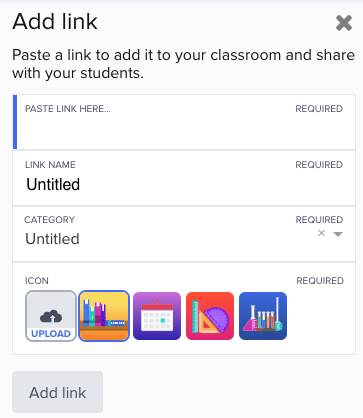
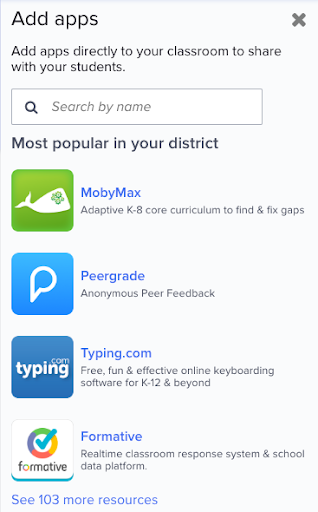
All pages in your portal are customizable by the teacher with the exception of the District page. Pages can have Applications or Links on the page, which can be placed in Categories (you are required to have at least one). All of these are added with the ![]() button.
button.
- Categories – adds a new untitled category. Click on Untitled to change the name
- Link – add a shortcut to any webpage (this could include Google resources as well)
- Copy and paste the link URL; give it a name, place it in a category, and select an icon (you can upload your own or use one of the 4 pre-populated options)
- Copy and paste the link URL; give it a name, place it in a category, and select an icon (you can upload your own or use one of the 4 pre-populated options)
- App – add applications by searching by name, or you can click on more resources to be taken to the Library.
Each page can have its visibility set to all of your students, a specific set of classes (applicable primarily to secondary teachers), or set to only visible to the teacher.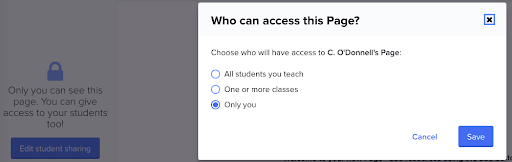
Classes Tab
On the classes tab, you will have a tile for every course title that you see in MiStar. There are 3 links on each tile: Launch an app, Log class out, and class details by clicking on the name of the class.
- Launch an app – all of your students need to have their Clever portal (site) open, click the button and an application available to that class can be selected and automatically launched for the whole class.
- Log class out – This button can be used to log all of your students out of the Clever portal (note: this will also log them out of Google Applications as well).
- Clicking the class name – This will take you to a page with all of your students and the list of launchable apps.
- Clicking on a student rostered in the class will give you some basic information about the student as well as log in supports for the student.
- For those students able to use QR Badges (K-2), an individual badge can be printed from here
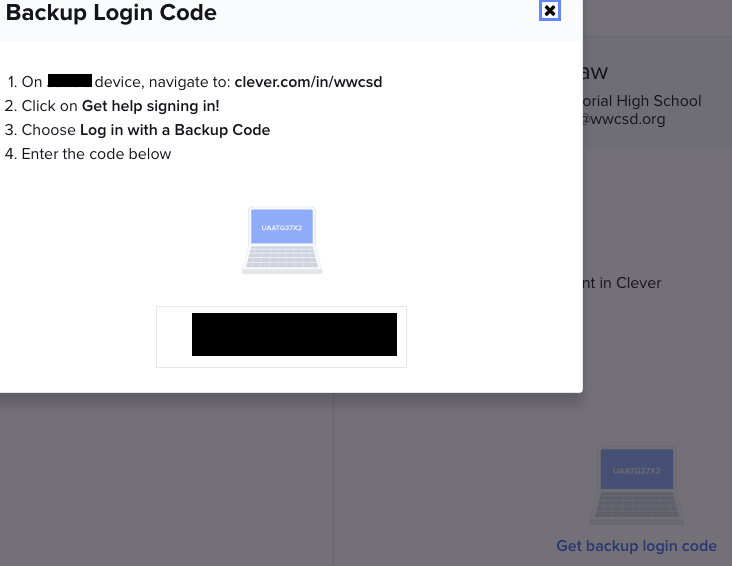
- For all students, a Backup Code can be retrieved for students who are struggling to get logged in.
Library Tab
The Library tab has all of the applications that are available for teachers to add to their class Clever portal. The collection can be filtered by subject or grade.
As always if you would like to know more, you can contact one of your Technology Integration Specialists!
You must be logged in to post a comment.